Hi,
I am somewhat new to Webflow (only made a couple of sites) but wanted to know how to produce a before/after slider. In my case: a van before and after a paintjob (it would essentially be two jpegs).
Can anyone give me any pointers how I go about creating one or if it is indeed possible to make on in Webflow I would really appreciate it?
I only have a little coding experience (hence I’m using Webflow) so please bear that in mind.
Thanks
Previously I demonstrated a before-and-after image comparison technique using the HTML5 range input. From a UX perspective, the operation of that slide comparer could be significantly improved, as it requires the user to interact with a relatively...
sabanna
November 4, 2015, 5:55pm
3
Well… I did it <script> </script> tags and add to the footer part (before </body>). HTML/CSS - create in Webflow.<head> tag.
Result here: http://sapdesign-sandbox.webflow.io/before-after-slider
https://webflow.com/website/SAPDesign-sandbox (for check functionality)
Regards,
1 Like
Hei Anna.
Thank you so much for your help.
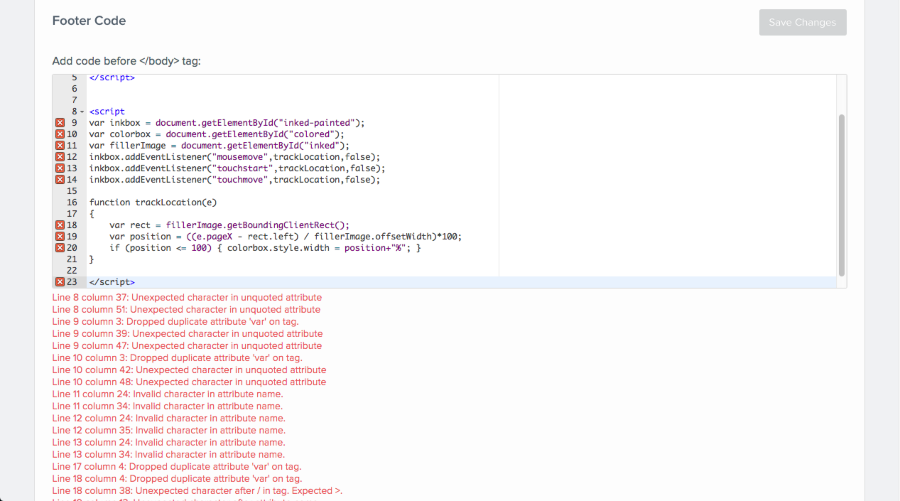
Heres what I getting when I paste the Java Script inside the Footer Code Area:
Could you please share a little bit more regarding the " HTML/CSS - create in Webflow. " part? How do I trigger the code inside Webflow? From where? Here? Screen Shot 2015-11-05 at 16.19.55 If yes, what line of code do I insert there?
How / Where do I insert the 2 images ( Color / BlacknWhite ) ?
Thank you so much for your help, Anna!
Have a great one,
Andrei.
sabanna
November 5, 2015, 3:53pm
5
Hello @andreiblanda !
You did not close 1st script tag, you lost “>”
Mainly you have to follow instructions from the article.
Prepare 2 pictures same size, but 1 outlined (no colors) and another colored.
Create HTML structure just like on their code:
<div id="inked-painted">
	<img src="inked-panel.png" id="inked" alt>
	<div id="colored"></div>
</div>
create div (drag and drop it from the panel), give it any class, but it should have ID just like in the code: inked-painted
inside that div put image (no colors), give any class but ID should be just like in the code: inked
inside the div add one more div, any class but ID from the code: colored.
Next step - styling elements just like in CSS code from the article:
div#inked-painted {
	position: relative;
	font-size: 0;
}
div#inked-painted img {
	width: 100%;
	height: auto;
}
div#colored {
	background-image: url(colored-panel.jpg);
	position: absolute;
	top: 0;
	left: 0;
	height: 100%;
	width: 50%;
	background-size: cover;
}
First div- position: relative and font size = 0px, and I gave it height and width in px, because my image was too big.
Image - width: 100% and height: auto
Second div - position: absolute, height: 100%, width: 50%, aligning: top=0, left=0, add background image to this dive - colored image, background-size: cover.
With new feature “custom cursor” you can pick any cursor you want for first div (it will appear on the screen when user will hover div):
Now just few lines of CSS to the custom code area, to the <header> :
<style>
     div#inked-painted {
	position: relative;
	font-size: 0;
	-ms-touch-action: none;
	-webkit-touch-callout: none;
	-webkit-user-select: none;
   }
</style>
And ALL javaScript code to the area before </body>
<script>
  var inkbox = document.getElementById("inked-painted"),
  colorbox = document.getElementById("colored"),
  fillerImage = document.getElementById("inked");
  inkbox.addEventListener( "mousemove", trackLocation, false);
  function trackLocation(e) {
	var rect = fillerImage.getBoundingClientRect();
	var position = ((e.pageX - rect.left) / fillerImage.offsetWidth)*100;
	if (position <= 100) {
		colorbox.style.width = position+"%";
	}
  }

  inkbox.addEventListener( "touchstart", trackLocation, false);
  inkbox.addEventListener( "touchmove", trackLocation, false);

</script>
DONE
Good luck
Anna
3 Likes
Wow. Thank you so, so much for the effort you put into this, Anna. I`ll be following up on this as soon as I implement it. Thank youuu!
1 Like
sabanna
November 6, 2015, 1:36pm
7
You are welcome, Andrei and good luck!